How to Use a Sled Push to Build Power, Speed, and Endurance

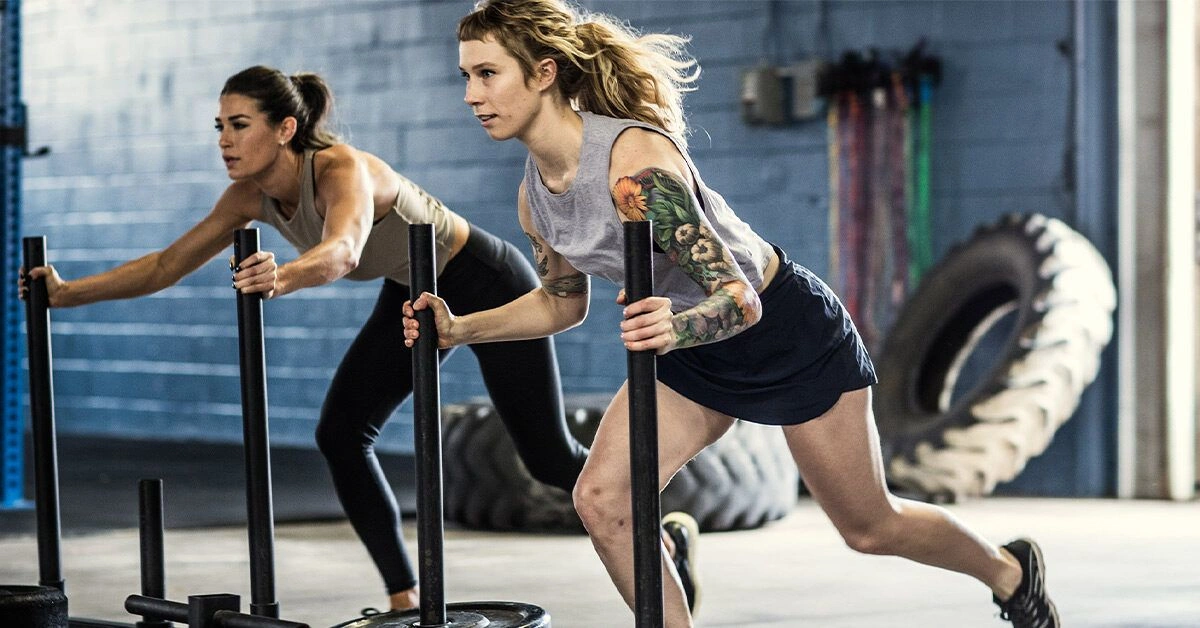
- What are the advantages of the sled push?
- 1. Whole-body engagement
- 2. High calorie expenditure
- 3. Improved conditioning
- 4. Enhanced speed
- 5. Functional movement training
- 6. Scalable for any fitness level
- How to add the sled push to your workouts
- Using the sled push to train speed
- Using the sled push to develop power
- Using the sled push for endurance
- Safety tips for the sled push
- The takeaway
If you want to introduce variety and intensity into your training, try the sled push — a superb exercise for whole-body conditioning, building strength, enhancing speed and acceleration, and torching calories.
Whether you use it as a finisher for leg day or include it in a full-body circuit, adding the sled push into your program will push your body to deliver better outcomes.

What are the advantages of the sled push?
The sled push is a whole-body strength, power, and speed movement that enhances velocity, raises performance, and burns calories. Below are six reasons to incorporate this exercise into your fitness plan.
1. Whole-body engagement
When executed properly, the sled push activates both upper- and lower-body muscle groups. More specifically, this movement targets your:
- quadriceps
- glutes
- calves
- hamstrings
- abdominals
- hip flexors
- chest
- triceps
- shoulders
These muscles are recruited whether you add plates to the sled or simply push the sled itself.
2. High calorie expenditure
If you haven’t tried pushing a loaded sled, prepare for an intense, heart-elevating, calorie-burning session. Whether you slot the sled push into a full-circuit or finish your workout with a few sled sets, it will raise the caloric cost of your training.
3. Improved conditioning
Switching between heavy and light sled pushes allows you to train for both power and speed, according to a 2019 review (1).
Loading the sled with moderate-to-heavy resistance develops both cardiovascular and muscular strength and endurance. To emphasize speed, reduce the resistance and push more rapidly.
You can also remove the weight and push at a slower pace for longer durations to build endurance and general fitness.
4. Enhanced speed
Using a weighted sled as part of a training plan can help increase sprinting speed.
A 2019 study of 50 high school athletes examined the effects of loaded and unloaded sled pushing on sprint training. The investigators concluded that sled pushes with any added load outperformed unresisted pushes (2).
They reported that heavier loads may yield the largest improvements in short-distance sprint performance (2).
To test this, students were split into four groups: one unresisted and three with light, moderate, or heavy resistance. All groups completed two sled-push sessions twice weekly for 8 weeks (2).
While all resisted groups improved, the biggest gains were seen in the heavy-resistance group (2).
5. Functional movement training
You may not often need to shove a heavy sled in daily life, but there are occasions when moving heavy objects is required (for example, pushing a stroller up a hill or shifting furniture).
The National Strength and Conditioning Association notes that safely performing such tasks requires static core strength to stabilize and maintain body position while pushing with the arms (NSCA).
It’s also important to understand proper hip positioning and how to brace the lower back to avoid injury.
6. Scalable for any fitness level
The sled push can be modified for beginners through advanced exercisers. If you’re new or returning from injury, push just the unloaded sled. Gradually add weight in small increments as you become stronger.
Advanced athletes can increase challenge by accelerating pushes and loading the sled with more resistance.
How to add the sled push to your workouts
How you perform the sled push depends on your skill, conditioning, and training aims.
If you’re new to the movement, start in a more upright, high-grip stance with your hands placed higher on the sled. This sets your body at roughly a 45-degree angle, which is easier and gentler on the lower back.
Once you’re comfortable, progress to a low-grip position that places your torso closer to parallel (about a 90-degree angle). Attempt the low-grip only after mastering the basic variation.

Using the sled push to train speed
- Load the sled with about 25% of your maximal load. If you’re unsure, pick a weight you could push for 10 minutes with brief rests. Beginners may opt for no added weight.
- Stand behind the sled and grasp the poles with a high-grip hand placement.
- Brace your core and begin pushing the sled forward as quickly as possible, driving through your whole leg. Extend hips and knees with each stride. Your foot placement should mirror your running stance.
- Push for 10–20 yards.
- Rest 30–60 seconds.
- Repeat 4–6 times, taking 30–60 seconds between reps.
Using the sled push to develop power
- Load the sled with a moderate-to-heavy weight — around 70% of your maximum is a solid starting point. If unknown, use roughly 70% of your body weight.
- Stand behind the sled and take a medium- to high-grip hand position.
- Engage your core and push the sled forward as forcefully as you can, driving through the entire leg. Extend hips and knees as you propel the sled. Keep a running-like foot stance.
- Push for 10–25 yards.
- Rest for 30–60 seconds.
- Repeat 4–6 times, resting 30–60 seconds between sets.
Using the sled push for endurance
- Load the sled with a light weight — about 25% of your maximum is a reasonable guideline. If unsure, choose a load you could push for 10 minutes with brief breaks. Newcomers can push the sled unloaded.
- Stand behind the sled and grip the poles in a high position.
- Brace your core and begin pushing, driving through the entire leg. Extend hips and knees as you move the sled. Your foot alignment should resemble your natural running posture. There’s no need to push at maximal speed since the focus is endurance.
- Push for 1 minute.
- Rest for 30–60 seconds.
- Repeat the 1-minute push and 30-second rest 5–10 times.
Safety tips for the sled push
A major upside of the sled push is its adaptability across ability levels. By altering grip and resistance, you can transition from sport-specific power work to general conditioning.
Still, keep these tips in mind to stay safe and effective:
- Adopt a natural running stance while pushing the sled.
- Maintain a neutral spine throughout; avoid rounding your back.
- If your core is weak, begin with light or no weight and concentrate on engaging your abdominals.
- Emphasize knee drive during the push.
- Use an extended-arm position to maximize acceleration; a bent-arm position suits pushing maximal loads.
- Perform the exercise on a level surface; many gyms provide turf strips for sled work.
- Wear supportive shoes with good traction.
- Take adequate rest between sets.
- If you feel pain during the movement, stop and seek guidance from a trainer or physical therapist to check your form.
- Consult your doctor or physical therapist if you have prior issues with your lower back, ankles, or knees.
The takeaway
The sled push is a practical, full-body exercise that targets the quads, glutes, hip flexors, calves, hamstrings, core, triceps, chest, and shoulders.
Based on your objectives, you can push the sled with light resistance for longer intervals or add heavy plates and push for shorter distances.
As with any exercise, if you experience pain or unusual discomfort while performing the sled push, stop and reassess your technique. If pain persists, consult a physician or physical therapist for further evaluation.
Frequently Asked Questions
The sled push engages the whole body, primarily working the quadriceps, glutes, hamstrings, calves, hip flexors, core, chest, triceps, and shoulders.
Beginners should start with an unloaded sled or light weight, use a high-grip, more upright stance, focus on form and core bracing, and gradually add weight as strength improves.
Yes. Using resisted sled pushes, especially with moderate to heavy loads, can enhance sprint force and acceleration, contributing to faster short-distance sprinting.
For endurance, use lighter loads and longer pushes (e.g., 1 minute with short rests). For power, use heavier loads and shorter, explosive pushes (e.g., 10–25 yards with full rest between sets).
Maintain a neutral spine, brace your core, use a natural running stance, start with light loads if needed, wear good traction shoes, perform on a level surface, and stop if you feel pain.
Read Next


Related Posts
Pregnancy Yoga Stretches for Back, Hips, and Legs
Sep 15, 2026 • 26 min read
How Rear Lateral Raises Can Benefit Your Workout Routine
Sep 17, 2026 • 3 min read
How to Get Toned Arms: 7 Exercises
Sep 29, 2026 • 28 min read
What Are the Best Alternatives to Pushups?
Sep 14, 2026 • 36 min read
8 Alternatives to Leg Extension Exercises
Sep 14, 2026 • 9 min read