Ever felt like your glutes are stuck in a “flat‑as‑a‑pancake” stage no matter how many squats or deadlifts you click? You’re not alone. The Kas glute bridge exercise is the quiet hero that many fitness‑junkies swear by for that extra “pop” in the backside. In the next few minutes we’ll walk through exactly what the Kas bridge is, why it’s such a handy hip stability exercise, and how you can slot it into any routine—whether you’re training at home or in a packed gym. Grab a coffee, lean back, and let’s demystify this move together.
What Is It?
Definition & Origin
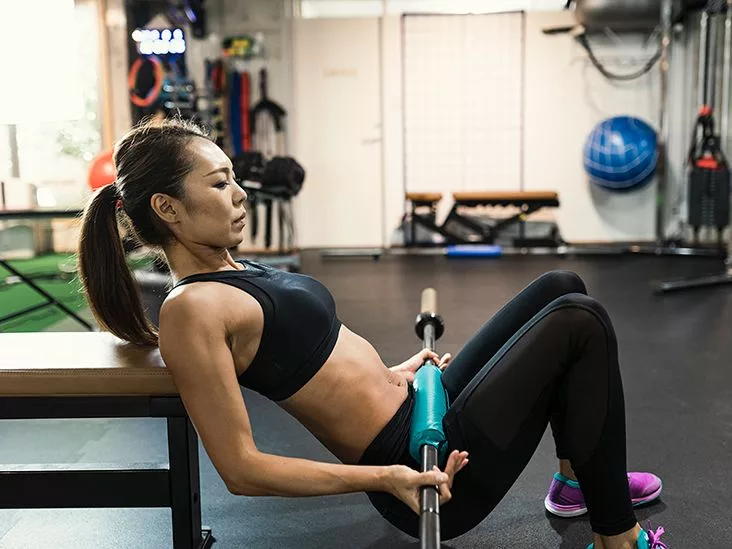
The Kas glute bridge is a hybrid between a classic glute bridge and a hip thrust. Unlike a floor‑only bridge, you place your upper back against the edge of a bench (or any sturdy elevated surface) while your hips lift off the ground. The name comes from coach Kassem Hanson, who helped popularize the movement on social media a few years back. Think of it as the “sneaky middle‑child” of glute exercises—quiet, but surprisingly effective.
How It Differs From the Classic Bridge
A standard glute bridge is performed on the floor, so you have a longer range of motion and often rely on momentum. The Kas version shortens that range, forcing the glutes to stay under tension the entire time. The bench gives you a stable, slightly higher starting point, which means you can load the movement with a barbell or dumbbells without worrying about the weight dropping to the floor.
Kas vs. Hip Thrust vs. Traditional Bridge
| Exercise | Bench/Back Position | Range of Motion | Primary Target | Typical Load |
|---|---|---|---|---|
| Kas Glute Bridge | Upper back on bench, hips off ground | Short, controlled | Glutes (max, med, min) | Barbell/Dumbbell |
| Hip Thrust | Upper back on bench, hips fully extended | Full | Glutes + Hamstrings | Heavy barbell |
| Traditional Glute Bridge | Floor, no bench | Full | Glutes + Hamstrings + Core | Body‑weight |
According to a study published in the Journal of Strength & Conditioning Research, hip‑hinge exercises that keep tension on the glutes—like the Kas bridge—show some of the highest gluteus maximus activation scores out of common lower‑body moves.
How To Do It
Equipment Checklist
You’ll need a flat bench (or a sturdy couch), a barbell (or a pair of dumbbells/weight plates), and a padded barbell pad or a towel for comfort. If you’re just starting, a resistance band can add gentle load without the need for heavy plates.
Step‑by‑Step Execution
- Setup: Sit on the floor with the bench directly behind you. Rest your upper back (shoulder blades) on the bench, hips just off the ground.
- Foot Placement: Plant your feet shoulder‑width apart, toes slightly turned out. Your knees should form about a 90° angle when you’re at the bottom.
- Load the Bar: If using a barbell, position it over your hips. Use a pad or towel to protect the pelvis.
- Brace Your Core: Pull your belly button toward your spine, keep your chest up, and gaze forward or slightly upward.
- Drive Up: Push through your heels, squeeze the glutes, and lift your hips until your body forms a straight line from shoulders to knees. Hold the top for a brief second.
- Control the Descent: Lower the hips by 2‑3 inches—don’t let the weight touch the floor—then repeat.
Breathing & Tempo
Inhale as you lower, exhale as you lift. Aim for a 2‑second up, 1‑second pause, 2‑second down tempo. This slower rhythm maximizes time‑under‑tension, a key driver of muscle growth.
Common Form Mistakes (And How to Fix Them)
- Hyperextending the lower back: Keep the spine neutral; think “flat back, not arched.”
- Letting the knees collapse inward: Push the knees outward lightly, engage the glute medius.
- Using too much weight too soon: Start with just the bar or a light dumbbell. HevyApp recommends mastering the movement without load before adding plates.
- Relying on momentum: Perform each rep slowly; the “pause at the top” is crucial for glute activation.
Why It Works
Glute Activation & Hypertrophy
Because the Kas bridge keeps the glutes under constant tension, you get a longer “muscle‑on” time compared with the explosive hip thrust. That prolonged tension translates into better hypertrophy results, especially for those who struggle to feel the glutes fire during other moves. The same study from the National Center for Biotechnology Information highlights that gluteus maximus activation spikes when the range of motion is short and controlled—exactly what the Kas bridge provides.
Hip‑Stability & Injury Prevention
Strong glutes act like a solid foundation for the hips and lower back. When you practice the Kas bridge regularly, you improve hip extension strength, which helps protect the lumbar spine during squats, deadlifts, and even everyday activities like picking up a stroller.
Low‑Equipment, High‑Reward
All you really need is a bench and a bit of weight. That makes the exercise perfect for home gyms, small apartments, or when the commercial gym is packed. Add a barbell when you’re ready for progressive overload, and you have a scalable glute‑strengthener that grows with you.
Variations (For All Skill Levels)
Barbell Kas Glute Bridge
Best for strength and size. Load a barbell with manageable plates, keep the grip firm, and focus on a controlled lift. This version was praised by RYSE for its “potent glute targeting” while keeping the spine safe.
Dumbbell / Kettlebell / Plate Variation
If a barbell feels intimidating, grab a single dumbbell or kettlebell and hold it at your hips. The weight distribution is a touch more forgiving on the pelvis.
Single‑Leg Kas Glute Bridge
Unilateral work adds balance and addresses left‑right strength imbalances. Place one foot flat while the other leg extends straight up, then perform the bridge. You’ll feel the glutes working overtime to keep you stable.
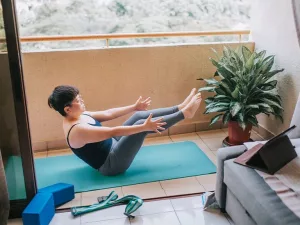
Floor Kas Glute Bridge
No bench? No problem. Perform the movement on a thick yoga mat, keeping the shoulders on the floor but the hips lifted. It’s a great travel‑friendly option.
Band‑Assisted / “Cross‑Over” Version
Loop a resistance band around your knees to add lateral tension, which recruits the gluteus medius—great for overall hip stability.
Programming (How to Slot It In)
Reps & Sets
For hypertrophy, aim for 3‑4 sets of 8‑12 reps. If you’re chasing raw strength, go heavy for 4‑5 sets of 4‑6 reps, resting 2‑3 minutes between sets.
Where It Belongs in a Split
- Leg‑Day: Pair with squats, lunges, and hamstring curls. The Kas bridge serves as a glute finisher.
- Full‑Body Circuit: Use a body‑weight version as a quick 30‑second “glute burst” between upper‑body moves.
- Active‑Recovery Day: Light weight or band version for blood flow without taxing the CNS.
Progression Strategies
- Increase the load (add plates or heavier dumbbells).
- Slow the tempo (e.g., 3‑second eccentric phase).
- Raise your feet on a small step to increase hip extension demand.
- Introduce a pause at the top of the lift (2‑3 seconds).
Deload & Recovery
Listen to your body—if you feel lingering soreness in the lower back or hips, drop the weight by 30‑50% for a week, focus on mobility drills (hip flexor stretch, glute foam roll), and resume full intensity when you feel ready.
Safety & Risks (Play It Smart)
Potential Risks
Like any weighted hip‑hinge movement, the Kas bridge can stress the lumbar spine, over‑activate the hamstrings, or strain the shoulder girdle if the bench is unstable.
Mitigation Tips
- Always keep a neutral spine; imagine a straight line from your head to your tailbone.
- Use a sturdy bench or a power rack with a bench attachment.
- Start with a light load and perfect your form before adding plates.
- If you have existing lower‑back issues, consult a physiotherapist before attempting heavy loads.
Quick‑Start Checklist
- Bench or sturdy surface
- Barbell/dumbbells (optional)
- Barbell pad or towel
- Feet shoulder‑width, knees at 90°
- Core braced, shoulders flat on bench
- 2‑second lift, 1‑second hold, 2‑second lower
- Start 3 × 10 with bodyweight, progress weekly
Give the Kas glute bridge a try this week—start with just the bodyweight version, feel the burn, then add a dumbbell next session. You’ll notice a tighter, more responsive backside and better hip stability in everyday moves like climbing stairs or picking up groceries.
Wrap‑Up
The Kas glute bridge exercise isn’t just a trendy name; it’s a versatile, low‑equipment movement that delivers serious glute strengthening, improves hip stability, and adds variety to any routine. Whether you’re a beginner learning the basics or an advanced lifter hunting that extra ounce of glute activation, the Kas bridge can be scaled to meet your goals. So, what are you waiting for? Grab a bench, set up the bar, and give your glutes the attention they deserve.
Got a favorite variation or a breakthrough moment with the Kas bridge? Drop a comment below or tag us on Instagram @YourFitnessHub. We love hearing about your progress and answering any questions you might have!


Leave a Reply
You must be logged in to post a comment.