
Hey there! If you’re reading this, you’ve probably wondered why your hormone‑replacement‑therapy (HRT) patch feels a bit “off” or why your doctor keeps telling you to stick it somewhere “below the waist.” Spoiler alert: the spot you choose really does matter. In the next few minutes we’ll walk through the science, the best patch application sites, how to apply and rotate safely, and even hear some real‑world stories from folks just like you. Grab a cup of tea, settle in, and let’s figure out the perfect place for your patch together.
Why Placement Matters
First things first – why does the location of an HRT patch change its performance? The answer lies in how trans‑dermal medication travels from the skin into your bloodstream.
How HRT Patch Absorption Works
The patch releases a tiny, steady stream of estrogen (or a combination of hormones) onto the outermost layer of skin, the stratum corneum. From there, the hormone diffuses through the epidermis and finally reaches the sub‑cutaneous fat. That fatty layer acts like a sponge, soaking up the medication and releasing it slowly into the bloodstream. The thicker and more uniform the fat, the steadier the hormone levels.
Role of Fatty Tissue in Hormone Uptake
Areas with richer fatty tissue HRT absorption—think lower abdomen, buttocks, and outer hips—give the patch a solid “landing pad.” Those spots have less hair, fewer sweat glands, and less friction from clothing, which means the patch stays put and the hormone can be absorbed evenly.
Why the Waistline Is a No‑Go Zone
The waistline (where your belt sits) isn’t just an aesthetic concern. It’s often tighter, has less sub‑cutaneous fat, and clothing can constantly rub the patch loose. Heat and humidity from tight jeans can also speed up the drug’s metabolism, leading to lower overall levels.
Impact of BMI & Body‑Composition
People with higher body‑mass indexes tend to have more fat under the skin, which can actually boost absorption. But there’s a flip side: if you’re on the heavier side, some patches might release a bit more hormone than expected, so dosage adjustments may be needed. A study highlighted that weight can influence patch efficacy, so keep that in mind when you discuss dosing with your provider.
Recommended Sites
Now that we’ve covered the why, let’s talk about the what. Below is a quick‑reference checklist of the safest below‑waist HRT sites, plus a few “if you have to” options.
| Patch Application Site | Fat Layer (approx.) | Typical Absorption | Common Irritation | Best For Rotation |
|---|---|---|---|---|
| Lower Abdomen (2‑4 inches below belly button) | Medium | Steady | Occasional skin redness if oily | Alternate left ↔ right |
| Upper Outer Quadrant of Buttocks | Thick | Highest (20 % more than abdomen) | Rare | Switch sides each change |
| Outer Hip / Side‑Back | Medium‑Thick | Good | Possible friction from pants seam | Rotate front ↔ back |
| Upper Outer Arm (rare) | Thin | Lower | Higher chance of itch | Only if other sites unusable |
Lower Abdomen (Below the Waist)
This is the classic “go‑to” spot. Choose a clean, dry patch of skin at least two inches away from your belly button, free of scars, stretch marks, or tattoos if possible. The area’s moderate fat layer gives reliable absorption, and the skin is usually easy to reach.
Upper Outer Buttocks
Many brands—like Estradot—actually recommend the buttocks because it’s the least likely to cause irritation. The thick sub‑cutaneous fat here means the hormone can soak in nicely without being “shaken off” by clothing. Just remember to keep the area clean and dry, and press the edges firmly (about 30 seconds) after applying.
Outer Hip / Side‑Back
If you find the abdomen or buttocks uncomfortable, the outer hip is a solid backup. It’s a spot most people forget, yet it offers a decent fat layer and is usually hidden from view—perfect for those who want discretion.
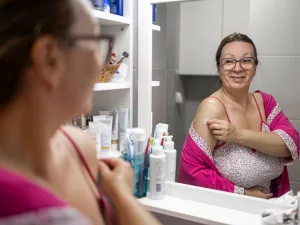
Upper Outer Arm (Optional)
Only consider this if the three core sites are off‑limits (e.g., scar tissue). The arm has thinner fat, so absorption may be a bit lower, but it can still work if you’re diligent about rotating.
What to Avoid
- Breasts or area directly next to them (risk of excess local estrogen).
- Waistline or any spot where tight clothing can rub the patch.
- Sun‑exposed skin (UV can degrade the medication).
- Areas with open cuts, rashes, or heavy hair.
- Stretch marks if you can help it—altered skin structure can affect absorption.
Step‑by‑Step Guide
Alright, let’s walk through the actual process of putting on and rotating your patch. Follow these steps and you’ll feel confident that the patch is doing its job—no more “did it work?” anxiety.
Preparation of the Skin
1. Wash the chosen site with mild soap and warm water.
2. Pat dry—no rubbing; let the skin air‑dry for at least five minutes.
3. Avoid lotions, deodorants, or powders that could create a barrier.
4. If you’re sweating (post‑workout), wait until the skin is completely dry.
Removing the Old Patch
Gently peel it off, pulling the edge toward you rather than upward. If there’s sticky residue, rub it with an oil‑based lotion (think baby oil) until it slides away. This helps prevent irritation.
Placing the New Patch
1. Open the pouch, remove the protective liner.
2. Align the sticky side with the skin.
3. Press down firmly with the palm of your hand, smoothing out any air bubbles.
4. Hold for about 30 seconds, especially around the edges.
Rotation Schedule (Featured Snippet‑Ready)
Here’s a simple, repeatable rotation table you can print out or keep on your phone:
| Day(s) | Site A | Site B |
|---|---|---|
| 1‑3 | Left lower abdomen | Right lower abdomen |
| 4‑7 | Left buttock | Right buttock |
| 8‑10 | Left outer hip | Right outer hip |
| Repeat | Continue rotating, never reuse the same exact spot two weeks in a row. | |
If It Lifts or Falls Off
‑ Within 30 minutes of noticing a lift, press it back down firmly.
‑ If the patch comes off completely, replace it with a fresh one and continue the original schedule (don’t double‑dose). According to the VFPP Pharmacy application guide, a patch that falls off should be replaced rather than re‑used.
Benefits & Risks
Understanding the upside and downside of proper HRT patch placement helps you make informed choices.
Benefits of Correct Placement
- Consistent hormone levels – fewer hot flashes and mood swings.
- Reduced skin irritation – especially when you avoid the waistline.
- Longer patch adhesion – you won’t be constantly re‑positioning.
- Convenience – a once‑weekly routine that fits into a busy life.
Risks of Wrong Placement
- Lower absorption → breakthrough symptoms (night sweats, mood dips).
- Skin irritation, redness, or contact dermatitis.
- Patch dislodgement → missed dose.
- Potential for uneven hormone distribution if the patch sits on a stretch‑marked area.
Special Cases – Stretch Marks & Scar Tissue
Many of us have stretch marks, especially after pregnancy or weight changes. A DrOracle advisory suggests avoiding them when possible because the altered skin can affect drug delivery. If you have no other choice, monitor your symptoms closely and talk to your prescriber about a potential dose tweak.
When to Call Your Provider
– Persistent rash or itching that won’t go away.
– The patch falls off more than twice in a week.
– You notice a sudden return of menopausal symptoms despite correct placement.
– Any concerns about weight‑related dosing.
Real‑World Stories
It’s one thing to read a textbook; it’s another to hear from people walking the same path.
Forum Voices – “Where is the Best Place to Put My Patch?”
On the Menopause Matters forum, a member named Teresa shared, “I tried the lower abdomen at first, but my jeans kept rubbing it off. Switching to the upper buttock solved the problem instantly.” Her experience echoes the product data that shows fewer irritations on the buttocks. (Menopause Matters discussion)
Trans‑Gender Perspective – Susan’s Place Thread
A user on Susan’s Place talked about dealing with hair and stretch marks on the belly: “I ended up using the side of my hip because the hair interfered with adhesion, and the patch stayed put for the whole week.” This highlights that personal anatomy can dictate the best spot, and rotating based on comfort is perfectly okay.
Clinical Expert Quote
Dr. Maya Patel, Board‑Certified Endocrinologist, tells us, “We advise patients to rotate between the lower abdomen, buttocks, and outer hip. This rotation not only maximizes absorption but also minimizes skin irritation, which is the most common complaint.”
Quick‑Reference Cheat Sheet
Keep this handy list at your bedside or on your phone.
- ✔ Clean, dry, hair‑free skin.
- ✔ Below the waist – lower abdomen, buttocks, outer hip.
- ✔ Press edges for 30 seconds.
- ✔ Rotate sites every 3‑4 days; never reuse the exact spot two weeks in a row.
- ✔ Avoid waistline, breasts, stretch marks, oily or sun‑exposed skin.
- ✔ Replace a fallen patch immediately; don’t double‑dose.
Wrapping It All Up
Choosing the right spot for your HRT patch isn’t just a “nice‑to‑have” detail—it’s the foundation of a stable, comfortable hormone regimen. By placing the patch on a fatty, low‑friction area below the waist, rotating regularly, and paying attention to skin health, you give yourself the best chance for steady hormone levels and fewer side‑effects.
Remember, every body is a little different. If you try the recommended sites and still feel off‑balance, reach out to your healthcare provider. They can tweak the dose or suggest a different brand that might suit your skin better.
Now that you’ve got the scoop, why not give it a try? Pick a spot from the table, apply today, and see how you feel over the next week. And if you’ve got a story—success, hiccup, or a clever tip—share it in the comments. We’re all learning together, and your experience could be the missing piece for someone else.
Feel empowered, stay curious, and keep those hormones humming!


Leave a Reply
You must be logged in to post a comment.