If you’ve just been prescribed Zepbound and the thought of a weekly injection feels a bit scary, you’re not alone. In the next few minutes we’ll walk through everything you need to know—what you need before you start, exactly how to give yourself the dose, where to inject, how to handle side‑effects, and a handful of little tricks that make the whole process feel almost effortless. Think of this as a chat over coffee with a friend who’s already been through the routine and is happy to share the best‑kept secrets.
Ready? Let’s dive in and turn that “I’m not sure how” into “I’ve got this!”
Quick Start Checklist
Before you even think about pressing a button, gather these items. Having everything at hand saves you from the “where’s the cap?” panic.
Required Supplies
- Zepbound pre‑filled pen (2.5 mg‑15 mg single‑dose) – double‑check the dose and expiration date.
- Alcohol swabs for skin preparation.
- A sturdy, FDA‑cleared sharps disposal container (or a heavy‑duty plastic box with a puncture‑proof lid).
- Clean hands – wash them with soap and warm water for at least 20 seconds.
Storage & Temperature
Keep the pen in the refrigerator (36‑46 °F). If you need to travel, you can leave it at room temperature for up to 21 days, but according to the official instructions, once it’s been out it should stay out; never refreeze.
Confirm Your Dose
Typical titration starts at 2.5 mg once a week and climbs in 2.5 mg steps every four weeks until you reach the prescribed maximum (often 10‑15 mg). Your doctor will tell you the exact schedule, but always verify the dose printed on the pen before each injection.
Side‑Effect Quick‑Check
Common reactions include nausea, mild stomach pain, and occasional injection‑site redness. If you notice anything that feels out of the ordinary—persistent swelling, severe pain, or signs of infection—call your provider right away.
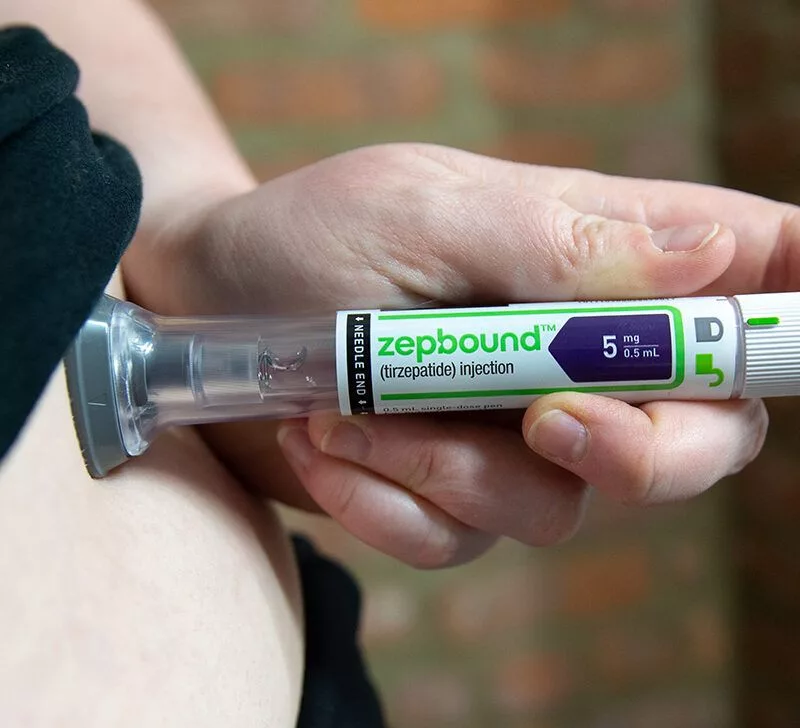
How to Inject
Now the fun part: the actual injection. Follow these steps exactly, and you’ll feel confident after the very first dose.
1️⃣ Prepare the Pen
- Leave the gray base cap on until you’re ready to inject. This protects the needle.
- Inspect the liquid: it should be clear to slightly yellow, free of particles, and definitely not frozen.
2️⃣ Choose & Clean the Injection Site
Recommended Sites
We always recommend three safe zones for sub‑cutaneous (under‑the‑skin) injection:
- Abdomen – lower belly, at least 2 inches away from the belly button.
- Thigh – outer middle third, between hip and knee.
- Upper arm (back) – the soft part on the back of the arm; you’ll probably need a hand‑off from a partner.
These locations contain enough fatty tissue for the medication to be absorbed steadily. A study from Simmons MD Health notes that rotating sites each week reduces irritation.
Rotate Weekly
Pick a new spot within the same region every week. For example, if you used the lower right abdomen last week, aim for the lower left abdomen this week. Rotation keeps the skin happy and avoids bruising.
Clean the Spot
Wipe the chosen area with an alcohol swab and let it air‑dry. This tiny pause prevents germs from sneaking in.
3️⃣ Position the Pen & Set the Angle
Hold the pen like a marker, press the clear base flat against the skin, then turn the lock ring to unlock. A 45° angle works for most people; if you have very thin skin, a 90° (straight‑in) pinch is fine—just make sure the needle stays under the skin.
4️⃣ Deliver the Dose
- Press and hold the purple button for up to 10 seconds.
- Listen for two clicks: the first means the injection has started, the second confirms it’s finished.
- When the gray plunger appears, you know the full dose has been delivered.
5️⃣ Post‑Injection Steps
- Remove the pen and immediately place it in your sharps container.
- Do not attempt to recap the needle.
- Record the date, site, and dose in a simple log (many readers love printable trackers).
Dosage & Titration
Understanding the dosing schedule helps you stay on track and anticipate when your weekly dose will change.
| Week | Typical Dose (mg) | Notes |
|---|---|---|
| 1‑4 | 2.5 | Starting dose; monitor tolerance. |
| 5‑8 | 5.0 | Increase if no severe side‑effects. |
| 9‑12 | 7.5 | Typical for most patients. |
| 13‑16 | 10.0 | Higher efficacy, watch GI symptoms. |
| 17+ | 12.5‑15.0 | Maximum approved dose; discuss with provider. |
Never skip a dose without talking to your doctor. If you miss a week, most clinicians advise you to take the missed dose as soon as you remember—provided it’s less than 3 days late. Beyond that, wait until your next scheduled day.
Injection Site Guide
Let’s zoom in on each of the three recommended spots so you know exactly where to press.
Abdomen (Lower Belly)
- Locate the area between your hips and just above your hip bones.
- Avoid the 2‑inch circle around the belly button – that spot can be tender and sometimes houses small veins.
- Imagine drawing a small “U” shape on the lower belly; any point inside that “U” works.
Thigh (Outer Middle)
- Stand with your feet shoulder‑width apart.
- Place your hand on the outer thigh; the sweet spot is roughly halfway between the hip and knee.
- Keep clear of the groin and the knee joint to avoid hitting bone or a nerve.
Upper Arm (Back)
- Raise your arm and locate the soft flesh on the back of the upper arm.
- This site is best for a partner’s help because it’s hard to see yourself.
- Again, aim for the middle of the muscle, not too close to the shoulder.
Managing Reactions
Most people experience only mild, temporary redness or a tiny bruise. Here’s how to keep those reactions from becoming a nuisance.
Typical Reactions
- Redness – usually fades within an hour.
- Bruising – gentle pressure after injection can help.
- Itching – a cool compress calms the skin.
Prevention Tips
- Rotate sites faithfully; never inject in the exact same spot two weeks in a row.
- Warm the pen to room temperature (15 minutes on the counter) to reduce the sting.
- Use a light pinch of skin for a “pin‑prick” technique; this makes the needle travel a shorter distance.
When to Call a Provider
If you notice swelling that doesn’t go down after 24 hours, intense pain, pus, or fever, it could be an infection. Those signs deserve a quick call to your doctor or a visit to urgent care.
Pro Self‑Injection Tips
These are the little hacks that make the weekly routine feel like a breeze.
- Timing matters – Pick a day and time you can stick to (e.g., every Tuesday after breakfast). Consistency keeps your blood levels steady.
- Hydration helps – Drinking a glass of water before injection reduces nausea.
- Protein snack – A 20‑gram protein bite (Greek yogurt, a handful of nuts) can calm stomach upset, a tip many patients share on forums.
- Use a timer – Count to 10 or set a phone timer while you hold the button. You’ll never wonder if you held it long enough.
- Track everything – A simple spreadsheet or printable sheet with columns for date, site, dose, and any side‑effects builds confidence and gives your doctor clear data.
Safety & Disclaimers
Everything you read here is intended for education only. It does not replace a personal consultation with a qualified healthcare professional. Zepbound is an FDA‑approved prescription medication; always follow the Medication Guide that comes with your pen.
Never share your pen with anyone else, and never reuse a needle. If the pen looks cloudy, contains particles, or is past its expiration date, discard it safely and request a new one from your pharmacy.
Get Help & Resources
If you ever feel stuck, here are a few places to turn to:
- Your prescribing doctor – They know your medical history best.
- Eli Lilly patient‑support program – Offers dosing calendars and financial assistance (check the official website for enrollment).
- CDC injection‑site guidelines – according to the CDC, proper skin cleaning and site rotation are key to preventing infections.
- Online video demos – Many reputable clinics post short, captioned videos that walk you through each motion.
Conclusion
Injecting Zepbound doesn’t have to be a mystery or a source of anxiety. With the right preparation, a clear step‑by‑step routine, and a few friendly tips, you’ll turn that once‑a‑week task into a simple, painless habit. Remember to keep your pen at the proper temperature, rotate your injection sites, log each dose, and reach out to your healthcare team whenever something feels off.
Now that you’ve got this guide, go ahead and set up your first injection day. You’ve got this – and you’re not doing it alone. If you have questions, experiences to share, or just want to say “I did it!”, drop a comment below. Let’s support each other on this journey to a healthier, happier you.


Leave a Reply
You must be logged in to post a comment.